पहा_यादी : वगळा

ऑड्यासिटी विकास माहितीपुस्तिकेवरुन
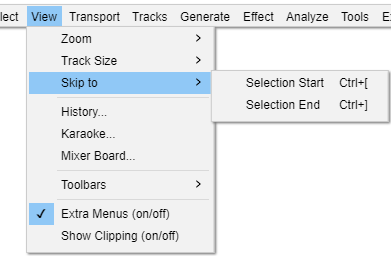
या आज्ञा्स तुम्हाला तुमच्या सध्याच्या निवडीच्या सुरूवातीस किंवा शेवटी कर्सरची स्थिती सहजपणे वगळण्यास सक्षम करतात.
View Menu has commands that determine the amount of detail you see in all the tracks in the project window. It also lets you show or hide Toolbars and some additional windows such as Undo HistoryTransport Menu commands let you play or stop, loop play, scrub play or record (including timed and sound activated recordings)Tracks Menu provides commands for creating and removing tracks, applying operations to selected tracks such as mixing, resampling or converting from stereo to mono, and lets you add or edit labelsGenerate Menu lets you create audio containing tones, noise or silenceAudacity includes many built-in effects and also lets you use a wide range of plug-in effectsThe Analyze Menu contains tools for finding out about the characteristics of your audio, or labeling key featureThe Tools Menu contains customisable toolsThe Extra menu provides access to additional Commands that are not available in the normal default Audacity menusThe Help Menu lets you find out more about the Audacity application and how to use it.  It also includes some diagnostic tools.Zoom in/out on the horizontal axisControls the sizes of tracksMove forward/backwards through the audioBrings up the History window which can then be left open while using Audacity normallyBrings up the Karaoke window, which displays the labels in a "bouncing ball" scrolling displayMixer Board is an alternative view to the audio tracks in the main tracks windowToolbars can be used to determine which of the Audacity toolbars are displayedShows extra menus with many extra less-used commandsOption to show or not show audio that is too loud (in red) on the wave formWhen there is a selection, moves the cursor to the start of the selection and removes the selectionWhen there is a selection, moves the cursor to the end of the selection and removes the selectionThe MenusView-Skip toMenu.png
Click for details
अधिक जाणून घेण्यासाठी इमेजवर क्लिक करा


Bulb icon निवड प्रारंभ आणि निवड समाप्तीच्या वापरासाठी टिपा:
  • झूम इन किंवा आउट केल्यानंतर एकतर आज्ञा वापरणे निवडीच्या काठावर झूम इन किंवा आउट करण्यासाठी कीबोर्ड पद्धत प्रदान करते. या आदेशांसाठी कीबोर्ड सोपा मार्ग सक्षम करण्यासाठी कीबोर्ड प्राधान्य पृष्ठावर जा आणि पूर्वनियोजित पूर्ण वर सेट करा. हे अन्यथा केवळ Ctrl आणि माउस व्हील स्क्रोल द्वारे शक्य आहे जेव्हा माउस पॉइंटर दोन्ही निवडीच्या काठावर स्थित असतो.
  • काही बाबतीत. एकतर आज्ञाचा कोणताही परिणाम होणार नाही किंवा निवड डावीकडे किंवा उजवीकडे असल्यास निवड काठ पूर्णपणे मध्यभागी हलू शकत नाही जेणेकरून टाइमलाइन स्थिती पुरेशी हलू शकत नाही. उदाहरणार्थ, वेव्हफॉर्म सेंटर पॉईंटच्या पूर्ण डावीकडे निवड हलवू शकत नाही जर तरंगाची दृश्यमान डावी किनार शून्यावर सुरू झाली. गीतपट्टावर्तन प्राधान्यांमध्ये "शून्य डावीकडे स्क्रोल करणे सक्षम करा" सक्षम केले असल्यास, प्रदर्शन स्क्रोल करणे नेहमीच शक्य होईल जेणेकरून कर्सर किंवा निवड किनार गीतपट्टाप्रदर्शनाच्या मध्यभागी असेल.

निवड प्रारंभ  Ctrl + [    अतिरिक्त

झूम पातळी न बदलता, वर्तमान निवडीच्या डाव्या काठाला स्क्रीनच्या मध्यभागी हलवण्याचा प्रयत्न. जर तुम्ही निवडीच्या उजव्या काठावर खूप झूम इन केले असेल आणि नंतर डावीकडे पहायची इच्छा असेल, जी सध्या स्क्रीन बंद आहे. तसेच जर तुम्ही खूप दूर स्क्रोल करून निवडीकडे पूर्णपणे दुर्लक्ष केले असेल, तर ही किंवा सहचर आज्ञा "Skip to Selection End" (खाली) निवड नेहमी स्क्रीनवर परत आणेल.

निवड समाप्त  Ctrl + ]    अतिरिक्त

झूम पातळी न बदलता, वर्तमान निवडीची उजवी धार स्क्रीनच्या मध्यभागी हलवण्याचा प्रयत्न करतो. जर तुम्ही निवडीच्या डाव्या टोकाला खूप झूम इन केले असेल आणि नंतर उजवीकडे पहायची इच्छा असेल. जी सध्या स्क्रीन बंद आहे. तसेच जर तुम्ही खूप दूर स्क्रोल करून निवडीकडे पूर्णपणे दुर्लक्ष केले असेल, तर ही किंवा सहचर आज्ञा "Skip to Selection Start" (वर) ही निवड नेहमी स्क्रीनवर परत आणेल.

<  वर परत: यादी पहा