संपादन यादी : 'विशेष' काढा

ऑड्यासिटी विकासाच्या माहितीपुस्तिकेवरून
येथून जा : निर्देशक, शोधा
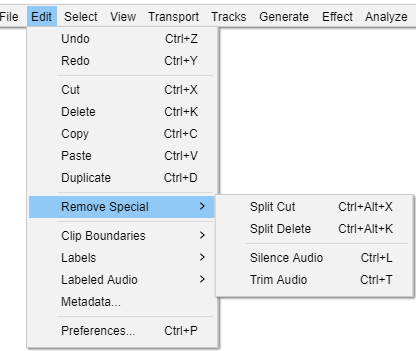
विशेष काढा  कास्केडिंग संपादन यादीमधील घटक विभाजित करून छेदा आणि विभाजित करून हटवाद्वारे ध्वनि किंवानावपट्टी (किंवा नावपट्टी सह ध्वनी, दोन्ही निवडले असल्यास) काढून टाका. या काढण्याच्या पद्धती निवडीच्या उजवीकडून ध्वनि किंवा नावपट्टीवर परिणाम करत नाहीत.

आपण केवळ ध्वनि शांत किंवा ट्रिम करू शकता, नावपट्टीला प्रभावित करीत नाही.

The Edit Menu provides standard edit commands (Undo, Redo, Cut, Copy, Paste and Delete) plus many other commands specific to editing audio or labelsSelect Menu has commands that enable you make selections of tracks or parts of the tracks in your projectView Menu has commands that determine the amount of detail you see in all the tracks in the project window. It also lets you show or hide Toolbars and some additional windows such as Undo HistoryTransport Menu commands let you play or stop, loop play, scrub play or record (including timed and sound activated recordings)Tracks Menu provides commands for creating and removing tracks, applying operations to selected tracks such as mixing, resampling or converting from stereo to mono, and lets you add or edit labelsGenerate Menu lets you create audio containing tones, noise or silenceAudacity includes many built-in effects and also lets you use a wide range of plug-in effectsThe Analyze Menu contains tools for finding out about the characteristics of your audio, or labeling key featureThe Tools Menu contains customisable toolsThe Extra menu provides access to additional Commands that are not available in the normal default Audacity menusThe Help Menu lets you find out more about the Audacity application and how to use it.  It also includes some diagnostic tools.Undoes the most recent editing actionRedoes the most recently undone editing actionRemoves the selected audio data and/or labels and places these on the Audacity clipboardRemoves the selected audio data and/or labels without copying these to the Audacity clipboardCopies the selected audio data to the Audacity clipboard without removing it from the projectInserts whatever is on the Audacity clipboard at the position of the selection cursor in the project, replacing whatever audio data is currently selected, if anyCreates a new track containing only the current selection as a new clipFor more "advanced" removal of audioCreate or remove separate clips in the audio trackThese commands are to add and edit labelsLabeled Audio commands apply standard Edit Menu commands to the audio of one or more regions that are labeledThe Metadata Editor modifies information about a track, such as the artist and genrePreferences let you change most of the default behaviors and settings of AudacitySame as Cut, but none of the audio data or labels to right of the selection are shiftedSame as Delete, but none of the audio data or labels to right of the selection are shiftedReplaces the currently selected audio with absolute silenceDeletes all audio but the selectionThe MenusEdit-Remove SpecialMenu.png
Click for details
अधिक जाणून घेण्यासाठी प्रतिमेवर क्लिक करा


मॅक वापरकर्ते : Ctrl = आणि Alt = पर्याय. तर, उदाहरणार्थ, Ctrl + Alt + K = ⌘ + पर्याय + K
Warning icon आपण ध्वनि काढता किंवा चिटकवता तेव्हा संपादन बिंदूंवर क्लिक ऐकू येईल. हे लहरींच्या रूपामध्ये डीसी ऑफसेटमुळे किंवा संपादनाच्या बिंदूंच्या चुकीच्या निवडीमुळे होऊ शकते. हे कसे हाताळायचे यासाठी हे संपादन वारंवार विचारले जाणारे प्रश्न पहा.

विभाजित करुन काढून टाका  Ctrl + Alt + X

संपादन > काढून टाका प्रमाणेच, परंतु निवडीच्या उजवीकडील ध्वनीची माहिती किंवा नावपट्टीपैकी कोणतेही स्थानांतरित केलेले नाही. अशा प्रकारे ध्वनिपट्ट्यामध्ये एक अंतर बाकी आहे जी सध्याच्या ध्वनि फितीला दोन फितीमध्ये विभाजित करते ज्यास वेळ बदलवणारे साधनाचा वापर करून स्वतंत्रपणे हलविले जाऊ शकते .

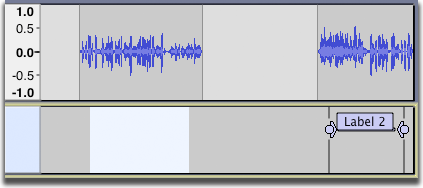
निवडलेल्या ध्वनीसह विभाजित करुन काढून टाका :
EditMenuRemoveSpecial InitialSelection.png
EditMenuRemoveSpecial SplitCut 2.png

इतर नावपट्टीवर परिणाम न करता नावपट्टीच्या गटातील एक नावपट्टी काढण्यासाठी ही उपयुक्त आज्ञा देखील आहे (आपण ध्वनि तसेच नावपट्टी काढून टाकू इच्छित नाही तोपर्यंत केवळ नावपट्टीच्या पट्ट्यामध्ये निवडण्याचे सुनिश्चित करा). हटविलेले विभाग खालील नावपट्टी डावीकडील जात नाहीत. नावपट्टी अद्याप समान ध्वनि प्रदेशांशी संबंधित आहेत. नावपट्टीच्या पट्ट्यावरील इतर कोणत्याही नावपपट्टीना प्रभावित न करता नावपट्टी हटविण्याचा हा द्रुत मार्ग आहे.

निवडलेल्या नावपट्टीसह विभाजित करुन काढून टाका :
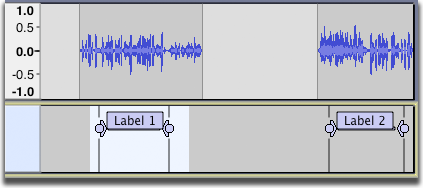
EditMenuRemoveSpecial SplitDelete 1.png
EditMenuRemoveSpecial SplitDelete 2.png

विभाजित करुन हटवा  Ctrl + Alt + K

संपादन > विभाजित करुन काढून टाका सारखे परंतु ध्वनि आणि / किंवा नावपट्टी क्लिपबोर्डवर ठेवलेली नाहीत.

पुढील दोन आज्ञा निवडीतील ध्वनीवर परिणाम करतात परंतु निवडीमध्ये असलेल्या कोणत्याही नावपट्टीवर त्याचा परिणाम होत नाहीत.

Tool edit silence.png ध्वनि शांत करा  Ctrl + L

निवडलेला ध्वनि शांततेसह पुनर्स्थित करतो.

EditMenuRemoveSpecial InitialSelection.png
EditMenuRemoveSpecial Silence 2.png

Trim.png ध्वनि ट्रिम करा  Ctrl + T

निवडलेला भाग वगळता सध्याच्या फित मधून सर्व ध्वनि काढून टाकते, उर्वरित ध्वनीमधून स्वतःची क्लिप तयार करते. त्याच गीतपट्ट्यामध्ये इतर वेगळ्या क्लिप असल्यास त्या काढल्या जात नाहीत किंवा हलवल्या जात नाहीत.

EditMenuRemoveSpecial InitialSelection.png
EditMenuRemoveSpecial Trim 2.png
निकालः उजवीकडे फितीमधील ध्वनि अप्रभावित आहे.

जर संपूर्ण फित (किंवा फित) निवडली असेल तर गीतपट्ट्यावरील इतर सर्व फित हटविल्या जातील.
<  परत: संपादन यादी