Apply Macro
- Accessed by:
- Using the button in the Manage Macros dialog, OR
- Directly from the menu
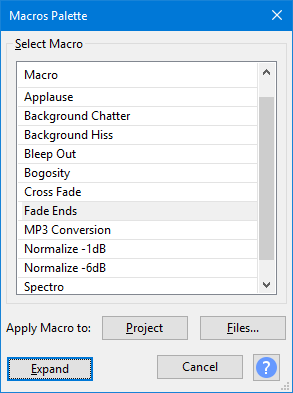
Select Macro
In the "Macro" list, left-click on a Macro (or use Up or Down keyboard arrow) to select the Macro you want to apply.
Apply Macro to
Both the Macros dialog and the Macro Palette dialog have 'Apply Macro to' Buttons.
Project: Use the button to apply the selected Macro to the current project window.
Files: Use the button to apply the selected Macro to selected external audio files that are in a single directory.
| If you already have audio in the current project window, you must save and close that project using before applying a Macro to files. |
| You cannot process multi-channel audio files (for example, 5.1 surround sound files) using Macros, even if Import / Export Preferences has been set to "Use custom mix". Any multi-channel files you import will be mixed down on export. |
| Macros will work on pre-existing selections you make in your project prior to running the Macro. But the selection can be over-ridden by your Macro itself as there are macro commands available to effect selections in the audio. In particular All(Select All) will select the entire project and Select which is parameterizable (see the provided Fade Ends Macro for an example where the first and last one seconds of the audio are selected for the fades). |
Apply Macro to
Project
Use the to apply the selected Macro to the current project window.
The effects in the Macro are applied to the selected region of waveform in the selected audio tracks. Usually the selected Macro would not include an export command so as to use the greater flexibility of the Export Audio Dialog.
If an export command is included in the Macro, the entire project audio is exported irrespective of track or region selection. Therefore if the project contains multiple audio tracks, they will be mixed together, unless any of the tracks are muted on the Track Control Panel.
The exported files will be saved in a folder named "cleaned".
- If the audio in the project came from an imported file or files, the "cleaned" folder will be inside the directory from which the first file was imported. The original files are not altered.
- Otherwise, a message prompt will indicate the location of the "cleaned" folder that will contain the exported file. The "cleaned" folder will be in the last location that the Macro process exported to. If the Macro process has never been used for export before, the "cleaned" folder will be in the location at which the File Export Dialog currently opens.
Files...
Use the button to apply the selected Macro to selected external audio files that are in a single directory. If you already have audio in the current project window, you must save and close that project using before applying a Macro to files.
| It is recommended not to process more than 500 files at a time. |
- A standard File Open dialog box will appear. Choose a directory then you can select one or any number of supported audio files in that directory, but not Audacity AUP project files. You cannot select files outside that directory, and files in folders inside that directory will not be processed. It is convenient therefore to first put all the audio files you want to process into one folder before applying the Macro.
- After selecting the audio files you want to process, choose "Open".
- Each file will be imported into Audacity and processed, exported to the format you chose in the Macro, then the processed audio will be removed so as to clear the temporary disk space that had been used.
- The exported files will be saved in a folder named "cleaned" in the same folder that the original files came from. The original files are not altered.
- If modifying the audio before exporting, the Select Time function may be useful to select audio to remove or modify.
- Some optional Nyquist plug-ins have parameters to trim or extend audio by a specific length and Nyquist can do calculations too, so it may be helpful to use Nyquist plug-ins from within a macro.
Expand
Use the to return to the full-size, full-function Manage Macros dialog.
The apply Macro buttons are also available on the Manage Macros dialog - so all Macro operations can be made from that full dialog.
Presets for effects
Since it is quite possible to have just a single command in a Macro you can use Macros to store your regularly used effects along with your favored settings.
| This Macros Palette is useful for presets for effects. It stays open after applying a macro, and you can pick another and apply that. |
| If you want, the presets can also adjust the selection. See Macros Examples for some suggested examples of this. |
Cancel to exit the dialog
The dialog will remain open on the screen, but allowing you to perform other Audacity functions.
To dismiss the dialog simply click on the button
Macros Examples
See the Macros Examples page for examples of using Macros.